One of the key components of a freelance business is time tracking. Without accurate time tracking, you might face difficulties when drafting your invoice templates.
There are several reasons you would want to track your time. Some examples include:
- You’re working on a proposal and want to measure how long it takes as part of continuous improvement or to build it into contract costs;
- You want to be better able to answer the client’s question “how long will this take,” so you track work for future reference;
- A client is paying you by the hour so you want to track work time for billing purposes;
- A client is paying you by lump sum and you want to track work time to ensure you’re getting value for your work in this or subsequent engagements;
- A client has you on a retainer and you have to log a certain number of hours per month;
- A client wants to know how much work you have done for them so you track to be transparent with the client.
In these and other instances, time tracking is how you measure productivity, look for ways to improve your time spent working (time blocking can help a ton), and create invoices based on work. Even if you weren’t a freelancer, time tracking systems are becoming the norm for all kinds of businesses.

Since time tracking is such an important part of your operation, how do you best track and report? Using a timesheet, which is a method for recording the amount of time you spend on each job.
Timesheets used to be a manual record on actual sheets of paper, but now timesheets are usually prepared and reported digitally. Timesheets can record the start and end time of specific tasks, record project milestones, or simply record the entire duration of a piece of work. Information recorded on timesheets can be translated into payroll, client billing, or be used for project management tracking, time estimation, and cost estimation.
As freelance blogger Megan Elliott states, “Figuring out what is a timesheet and how to use and interpret it is a great step in learning how to manage your time properly. It can also help you better understand where your time (and thus where your money) is going, so you can make smarter business decisions and better manage your budget.”
Bonsai can provide more information on timesheets.
Knowing how important they are, what can you use as a timesheet? With a bit of effort, you can build yourself a timesheet in Microsoft Excel to serve your needs. How to make a timesheet in Excel? Let’s look at that and some of the key components you will need to figure out, as well as other options for you to use for time tracking.

How to make a timesheet in Excel
It’s easy to get overwhelmed with Excel and the amount of data and cells and formulas that can be tracked in it. Making a timesheet in Excel can start with a simple number of values. This won’t fit everyone’s needs but it will get you used to using Excel and including the features important to a basic timesheet. We’ll look at tracking hours for one workweek, which can then be used each week, or even be adapted to handle biweekly or monthly tracking.
The example we’ll use will have only two basic Excel formulas. Start by defining the information you need to have on your timesheet. Let’s assume it’s only for yourself, and not for any employees or contractors you may have working for you. Time really is a business metric, so it’s important that you get comfortable with the concept of tracking it.

1. Tracking your daily work
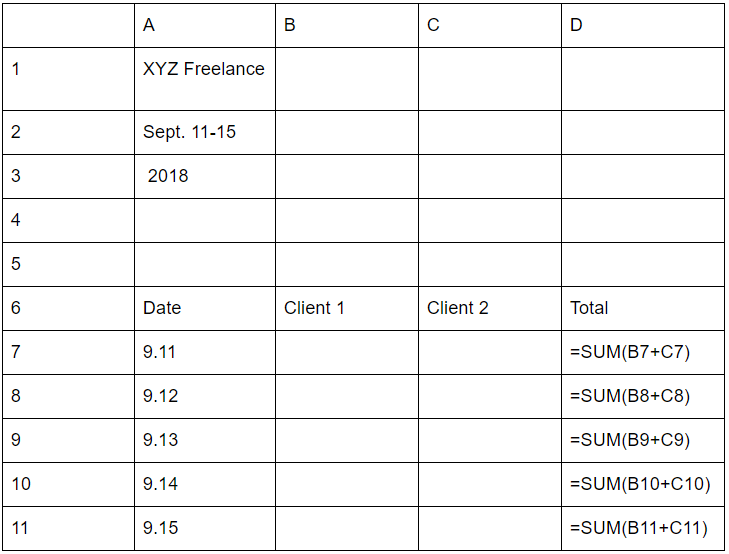
First, open a workbook in Excel. Typically you would add a field for your name, and a field for the time period the timesheet will cover (a five-day work week in our example).
Then build a week using the rows, in our example using dates. Across the columns, you can create values several ways, depending on your work, such as by morning or afternoon work or by task. In our example, we have used two clients.
In this simple example, you then have two values to create formulas for – total work per day and total work per week.

To calculate the hours worked in a day, go to the total hours cell at the end of the first workday (last column, which is D7) and insert =SUM(B7+C7). Once you have typed in all the hours in each column, the total day’s work hours will be added up in the final column. Then cut and paste this formula into each cell at the end of each column, changing the row number to correspond correctly.
2. Tracking your workweek
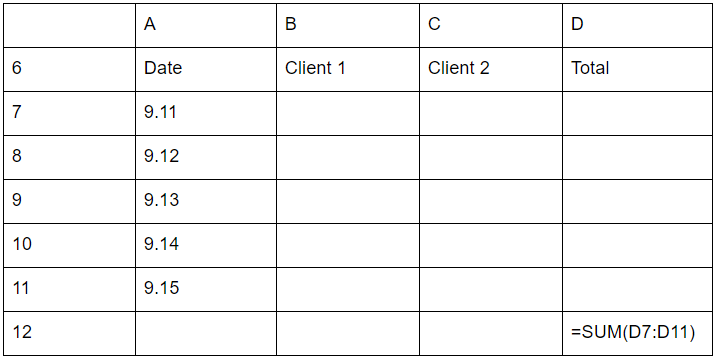
Now we’ll add another formula to calculate the entire workweek.

To do this, you go to the bottom of the column where each day’s total is displayed (in this example, D12), and insert =SUM(D7:D11). This will add up the values in column D that fall between rows 7 and 11.
You are now able to tell how much total work you do in a day, and your total work for a week. You can add sums to create work per client, which you can then use for billing. Remember that time spent on a task is not the only expense to include when billing a customer. As you get more comfortable with Excel, you can add more detail to the tracking.
If you’re finding you aren’t spending enough time doing actual work, Bonsai has some help with ways to manage your time as a freelancer.

Automated options for time tracking
If this sounds like a lot of effort, stress and calculations, there are other options available to you. Not everyone is savvy with Excel, with spreadsheets and building formulas.
As you are managing all the aspects of your business, maybe it would be better for you to spend your time completing proposals, finding jobs and writing – or whatever the format of your freelance business. Maybe it’s better to do the stuff you love to do, the stuff you get paid to do, rather than spend it building spreadsheets, tracking your time manually and figuring out your freelance invoices based on those spreadsheets.
Luckily, there’s an option available to you with Bonsai, which has a freelance time tracking tool that would make your life a lot easier.
With Bonsai, you can:
- Track Time in a Click: Track your freelance work seamlessly and switch between projects without the confusion of traditional time trackers.
- Centralize Your Time Sheets: Automatically fill in your timesheets or log hours manually to get a comprehensive view of your workday.
- Automate Invoicing: Use your time sheets to your advantage by automating invoicing from the time sheets. You can select your unbilled hours and send your invoice.
- Boost Productivity: Connect your tracker with your freelance proposal and contract and save precious time not re-entering your data between systems.
This time tracker solution can be fully integrated with your workflow and is available for desktop and mobile devices on web, macOS and iOS operating systems. By integrating with your workflow, I mean it brings together work on proposals, contracts and invoices, making your work seamless. In this way, you focus on the work you love, and leave it to Bonsai to handle the “back office” work that isn’t very enjoyable. After all, over 100,000 freelancers are using Bonsai. With products and resources to support your business, you can’t go wrong.
So while you can learn how to build a timesheet in Excel, you can also look to a professional system to support your work. If you’re ready to use Bonsai’s integrated time tracking solution, sign up for a free trial today.


